Pages

Showing posts with label essay. Show all posts

Thursday, June 20, 2013

Goodbye Clementine...

by Xani

Even a delinquent food blogger, like myself, knows that you can't just up and switch kitchens without blogging about it.  I've been cooking in this kitchen for almost exactly five years, most of the time this blog as been around!  And man, I have cooked some good stuff!  In fact, my entire approach to cooking and eating has drastically changed over the five years I've cooked there.  No longer cooking for just myself, keeping things a bit healthier and experimenting with baking, bread-making, canning, and other advanced techniques.

I remember when I was first moving in, looking at those curved concrete countertops and wondering if they would be functional, and being super-excited about having a dishwasher!

Little did I know what lie ahead of me in that kitchen: cooking one-handed after my motorcycle crash, having a boyfriend and a little one move in, and adding the always-begging Eddie to our pack.  The years have flown by, and the great parties, amazing meals and fun projects are just memories (forever captured in blog posts) now.  We've got just a few more days left in the house and I'm in constant "Pantry Raid" mode- cobbling together meals with whatever is in the pantry or freezer.  But, I managed a delicious Cast Iron Skillet Chicken the other night, not to mention an inspired pasta dish I named "Fettucine Rockerfeller" (because how else would you use up canned oysters??).  But as we reach the final days, I am, of course, looking forward to cooking in the next kitchen...

Which also happens to be the OLD kitchen!  Anyone remember this place...??

Photo

That's right, I'm moving back to the kitchen where I first learned to cook!  The exact spot where I developed my first "special dishes" (black beans, twice-baked potatoes) as a youngster and began my love affair with cooking.  I'm so happy and excited to (almost) be the proud owner of my childhood home.  The kitchen doesn't look quite the same as it used to, thanks to a complete renovation a couple years ago, but it's still big, has tons of counter space, with two sinks, a giant pot-rack, a sunny dining nook, and did I mention it's BIG?

Just think of what I'm going to cook up in there.  I've already got big plans for Sunday Dinners, brunches, theme parties, AND MORE!  All the more reason to stay tuned to BCD, Like our page on FB, follow us on twitter, instagram, Vine, and right here.  Hopefully lots more yummy posts coming soon...

Farewell old kitchen, and new kitchen here I come...!

X

P.S. I'll leave you with these memories of a kitchen and a home that has served me VERY well...
Little lettuces growing in my little backyard
Celebrating in style at our Mad Men party
Cooking up a storm
My house in Jack-o-lantern format...
Making popcorn with my Man...
Luckily this guy is coming with us- who else would eat all our strawberry tops!?

Wednesday, March 6, 2013

The Cook's Treats

by EP & Xani

When you think of the flavors of Thanksgiving, you might think of rich gravy, tart cranberries, juicy turkey, brussels sprouts (with bacon, if you're doing it right), and sweet pies topped with whipped cream. We, on the other hand, identify Thanksgiving with one particular "taste memory": turkey tails.  Also known as the Pope's Nose. (Sorry, Benedict...you're outta here anyway.).


"Turkey tails? What the...?", we hear you cry. Well, something has to hold up all that plumage!

Sunday, June 8, 2008

Switchin' Kitchens

by Xani

So, as many of you already know, this week I am moving to a new house. I've mentioned the impending move once or twice on the blog, and if you know me in person, you've suffered months of my constant whining and bitching about house-hunting, financing, negotiating, packing, etc, etc, etc. (Sorry! It's almost over, I promise. I love you and I OWE YOU!)

I'm currently writing this post surrounded by half-packed boxes in tinyhouse, which my friend and I lovingly named my current house when I moved in just about two years ago. Two years might not seem like such a long time, but it didn't take me long to get attached to tinyhouse. It's the first place I've ever lived that was all mine-- no parents, no roommates. At first I wasn't sure I would like living alone, but I quickly realized I LOVE it. My own space, my own stuff, my own home. I guess that's what I'm getting at here: tinyhouse is my home, and leaving it is bittersweet.

EP cooking in tinykitchen

Me in my kitchen, Halloween 2006

This is a food blog, so let's bring it back to the food, or more exactly, the kitchen. One of the things that was most exciting about moving into my own place was the complete and total control over the kitchen. I was so stoked to finally have everything in its correct place, keep a stocked pantry without worrying about weird looks from roommates ("why do you have so many cans of anchovies??"), and break out my good knives and other kitchen equipment. Prior to living in tinyhouse, I kept my good pots, pans, and especially knives, tucked safely away in storage. Roommates, even close friends who I trust with my life, could not be trusted to properly care for my kitchen stuff. Especially the knives; BCD Dad taught EP and I from a very young age about proper care of cutlery. NEVER leave a dirty knife laying on the counter or, god forbid, in the sink. Knives should be rinsed, wiped dry and returned to the knife block (never a drawer) immediately after use. Sharpen regularly. And so on. So tinyhouse finally gave me the opportunity to have my kitchen, my way.

Not that tinyhouse kitchen hasn't provided its own set of challenges. Tinyhouse=tinykitchen. This was the kitchen where I learned to survive without a dishwasher! Or a garbage disposal. It has very limited counter and cabinet space, and no pantry (I realize this is what most city-dwellers deal with, but remember the only other kitchen I had ever really cooked in was BCD Headquarters, so it was quite an adjustment). But even with these limitations, I quickly settled in and over the past couple years, I've managed to cook up some pretty decent grub. And I've hand-washed a LOT of dishes. And drank a lot of beers with friends on the sunny patio. I'll miss living here, and cooking here. And this is true even though the new house (nickname pending) is really an AWESOME place, with a great kitchen (gas range! concrete countertops! A DISHWASHER!!).

New Kitchen!

Is that a dishwasher I see??

I'm sure in no time I'll be making great food and great memories at my new place. There's definitely a delicious house-warming party in the near future. And at this point, the tinyhouse kitchen is pretty much closed. I've been eating leftover Ledo's pizza over the sink all week. So, I'm ready to move on. But there will always be a special place in my heart for tinyhouse and the time I spent here. A toast to tinyhouse!

X


Tuesday, September 4, 2007

All American Breakfast, for One-- An Essay

by Xani

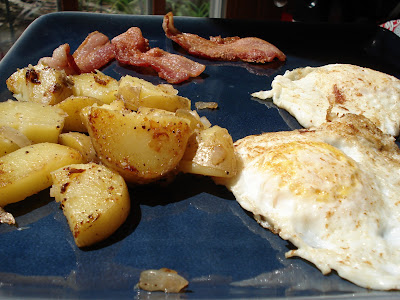
Sometimes, on a lazy weekend, there's nothing I like better than whipping up a little breakfast. I usually don't get around to doing this til noon or so, but hey, if its the first meal of the day, its breakfast. Especially if it involves sizzling bacon, perfect potatoes, and eggs done just the way I like them...

So on a recent Saturday that's just what I did! First step, bacon strips go in the pan over medium-high heat (I use a flat, non-stick griddle pan, with very short edges, i.e., not completely flat, or things will fall off the sides. Also, its big enough to cook several elements of the breakfast at once!). Once the bacon has cooked (I like mine pretty crispy) and rendered out its fat, remove the bacon from the pan and put on a paper towel-lined plate to drain (I suggest making an extra piece to nibble on while you cook the rest of the meal... hey, you know you want to!). Meanwhile, there will be puddles of delicious bacon fat sitting in the pan... this stuff is super-hot, so you want to carefully drain it into a heatproof dish. Some fat will remain in the pan. This is a good thing. You can keep the reserved fat nearby in case your pan dries out and needs more (this will definitely happen if you are cooking for more than one).

Next, the potatoes. I had boiled a few small, white potatoes the night before. They were completely cooked so I knew they would only take a few minutes in the pan (if you are going to start with raw potatoes don't try this method, but it would probably work with any leftover potatoes, baked, boiled, mashed [wow that sounds good, might need to try that sometime!] or in a pinch i have even used frozen tater tots which came out perfectly!). I cut them into chunks, skin and all, and threw them into the pan along with a handful of medium-diced onion, and some salt and pepper. Cook the potatoes and onions over medium heat. You eventually want to get them golden brown on all sides, and for the onions to be soft and aromatic... add more bacon fat if things start to get sticky. (Really, that should be my mantra for everything in life!)

Now, when the potatoes are almost done (maybe 5 minutes or so left), crowd them all onto one side of the pan. This is to free up space for the eggs. While some people think eggs are among the easiest things to prepare, I have always found them a challenge. Perhaps this is because I have BIG shoes to fill-- those of BCD Dad. Ever since I was a child, I have been a fan of his many egg preparations. Fluffy, creamy scrambled, perfect fried, and, hands-down, the best omelets I have ever had. No joke-- years ago I completely stopped ordering omelets in restaurants; no matter how many I tried they were never nearly as good as Dad's! BCD Mom often says that if things got really bad Dad could always get a job as a short-order cook!

So, over the years I've been trying to master his techniques. He shared with me his secret ingredients (basically lots of bacon fat or butter, or sometimes both) and his methods: very low heat for the scrambled eggs, very high heat for the omelets, the fillings, the flip, the fold... it's a lot to take in! But one preparation that I've finally mastered is the fried egg, and its one of my favorites.

Your pan should be over medium heat, potatoes on one side, other side liberally greased with bacon fat. Crack your first egg into a small bowl and then slide it carefully into the skillet (or if you are a daredevil like me, directly onto the hot pan-- potential tiny bits of shell be damned!). Repeat with the other egg (and so on, if you are making more than two, but don't overcrowd the pan or you won't have room to flip later). They will sizzle and begin to turn opaque on contact. Sprinkle with a little salt and freshly ground black pepper. Leave them be for a minute or two (the non-stick pan/bacon fat will ensure they don't stick), except you may want to use your spatula to "tighten up" the whites (nudge them in toward the yolk, therefore making flipping easier). After a couple minutes the bottom of the eggs should be cooked (firm with light brown bits), the yolk will still be completely runny and there may be some gelatinous, uncooked white on top, too. If you are a sunny-side up person, you're on your own here... you can eat the sucker all raw and runny, or you can spoon some of the hot fat from the bottom of the pan and pour it over the top of the eggs in an attempt to get it a little more cooked. I never understood those sunny-side up people, anyway... for the rest of us, its time to flip. This part can be a little intimidating, but honestly, its not that hard once you practice a couple times. And, even if the yolk breaks, it all tastes the same anyway.

The whites from the two eggs have probably fused together-- use your spatula to cut them apart so you can flip them individually. Lift the edge of the egg, again it should be firm and slightly browned underneath. Slide your spatula completely underneath the egg, using the side of the pan to push the egg onto the spatula. The yolk will be wobbling and threatening to break, but don't let it get to you! Once the egg is completely on-board, use your wrist to gently flip the egg back into the pan (gently= hopefully not breaking the yolk. into the pan= onto a bare surface of the pan, i.e. not onto the other egg, the potatoes, the stovetop, or the floor). Repeat with the other egg. Success! Once the eggs have cooked on their flip side for 30 seconds or so, you will have eggs over easy. Another minute or two, eggs over medium. Cook the hell out of them, over hard (you can tell how cooked the yolk is be pressing lightly on the exposed yolk facing up-- if it feels completely liquid-y, it is. Keep checking them and eventually you will feel them begin to firm up and feel more like a hard-boiled egg).
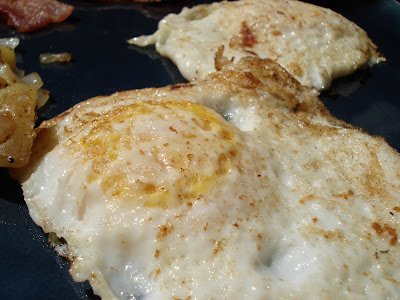
Correct level of done-ness needed before flipping
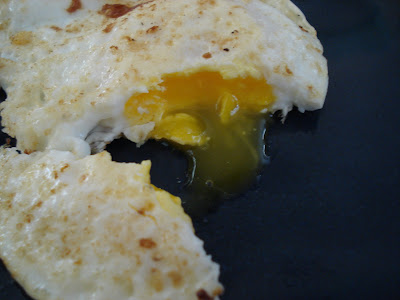
Correct done-ness of yolk for over-medium eggs-- mostly cooked, very slightly runny-- why can they never get this right at the diner?!

Once you have cooked them to the desired done-ness simply use your spatula to lift them out of the pan and onto your plate. The potatoes should be nicely cooked by now, they go next to the eggs. Then a couple strips of the bacon (unless you already ate it all, you little piggie!). Accompany with toast, juice, coffee... whatever you like. If you are lucky enough to have a cute little patio and a gorgeous day, I highly recommend eating outside!
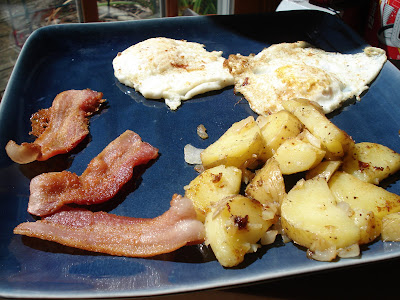
Hope you enjoyed my little essay/tutorial on All-American breakfast as much as I enjoyed cooking, eating, and writing about it! Sorry I couldn't provide more pictures-- breakfast for one means both hands were too busy cooking to take many pictures. How does everyone out there in Internet land like their eggs?

X

Blog Archive